If you’re looking to take your blog photos to the next level, you’ve come to the right place. We’re going to be breaking down what exactly PhotoVibrance (sometimes called Vibrance or Photo Vibrance) is, our personal experience with it and where you yourself can get in on the experience.

With an existing ‘excellent’ rating together with over 100x five star reviews on Trustpilot, we were incredibly excited to be able to take part in this highly rated experience of creating moving imagery for our blog.
What is PhotoVibrance?

With PhotoVibrance, users are able to transform their 2D, static images into moving motion pictures sure to catch anyone’s attention.
In addition to being incredibly pleasing to look at, these types of images are great for driving traffic towards your media pages. And to no surprise, that’s exactly what happened for us!
As I’m sure you know, clicks, attention and traffic is everything when it comes to online sites. When you are able to grab the attention of your viewers, you increase the amount of traction your page receives.
At photovibrance.io, you can find comparison images that contrast static pictures and moving pictures – the difference is undeniable. My attention was immediately drawn towards the moving image. Which one works best for you? With this in mind, we knew the potential that moving images could have on our traffic levels.
Take a look at one of the examples below, which one is the eye-catcher?

Aside from using PhotoVibrance for your blog posts, moving images are also great for advertising as well for posting on social media. Together with the animate effect, we loved the capability to add particles, parallax effect, overlays and replace the sky for that added wow factor.
Because we operate on a number of different social platforms, it can sometimes become difficult to find images of the correct size and resolution. However, there is an added feature of resizing the animated images to any resolution or size via custom dimensions.
Key Features
Why should I create animated images?
Adding animation to a photo can add an engaging and creative element to photographic content. By incorporating animation, brands can create an emotional connection with their audience that can’t be achieved through static images. Animation can also be used to breathe life into an image and create a truly unique look and feel that stands out from competitors. This especially is an important factor if you want to catch attention on social media, so it can also increase the discoverability of your content online, by allowing it to appear as an eye-catching moving image in searches and across multiple platforms.
Some great use cases for PhotoVibrance:
Boost E-commerce Sales: Animate product images to show them in action, making your online listings more engaging and persuasive.
Enhance Blog Posts: Incorporate animated visuals to emphasize key points, increasing reader engagement and shareability.
Real Estate Marketing: Animate property photos to offer potential buyers a dynamic view, making your listings stand out.
Social Media Engagement: Create eye-catching animated posts to capture attention, leading to higher engagement rates and more followers.
Email Marketing: Use animated images in your newsletters to grab the reader’s attention, potentially increasing click-through rates.
Digital Advertising: Implement animated visuals in your ads to make them more compelling, aiming for higher conversion rates.
Educational Content: Use animated diagrams or illustrations to explain complex topics, making your educational materials more effective.
Event Promotion: Animate event posters or banners to generate excitement and attract a larger audience.
Photovibrance Examples
Below are some examples of what you can create with PhotoVibrance. Mind Blowing isn’t it?
How does PhotoVibrance work?
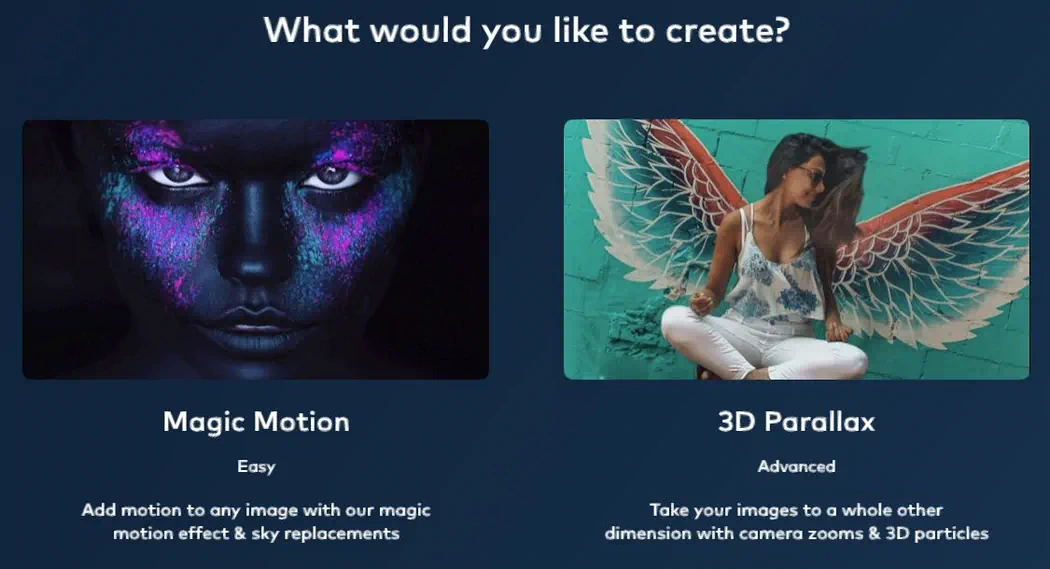
In this section of our PhotoVibrance review we’re gonna walk you through step by step just how exactly PhotoVibrance works. The image below has been done by us, using an image from Pexels. As soon as you’ve downloaded and installed the software for MacOS & Windows you’re ready to go. Each time you open the app you have to choose between creating a Magic Motion image or a 3D Parallax image. Depending on what you have selected, you’ll get a different set of tools to work with.

Magic Motion or 3D Parallax
First you need to make a selection between Magic Motion and 3D Parallax. Magic Motion is considered the easy functionality and the 3D Parallax option is more complex, but offers some stunning effects.
What is Magic Motion?
Magic Motion is an amazing new feature from PhotoVibrance that enables you to transform static images into mesmerizing moving images. Powered by AI and advanced image processing technology, Magic Motion automatically adds movement to your images. You can add subtle motion to draw attention to certain parts of your image, or add more exaggerated motion for a truly eye-catching effect. With Magic Motion, your images will come alive.
What is 3D Parallax?
3D Parallax is a revolutionary technology that allows you to transform static images into 3D motion pictures. It adds depth and dimension to everyday images, creating an immersive and engaging experience for viewers. With 3D Parallax, you can easily add movement and perspective to your photos, giving them a fresh, modern feel. Utilizing this technology, you can stand out from the competition while attracting more attention and engagement from potential customers. 3D Parallax is perfect for creating stunning visuals for webpages, social media posts, ads, and more.
Below is a stunning example 3D Parallax by Simon Newbury Photography, also showing you step by step how he achieved this incredible result.
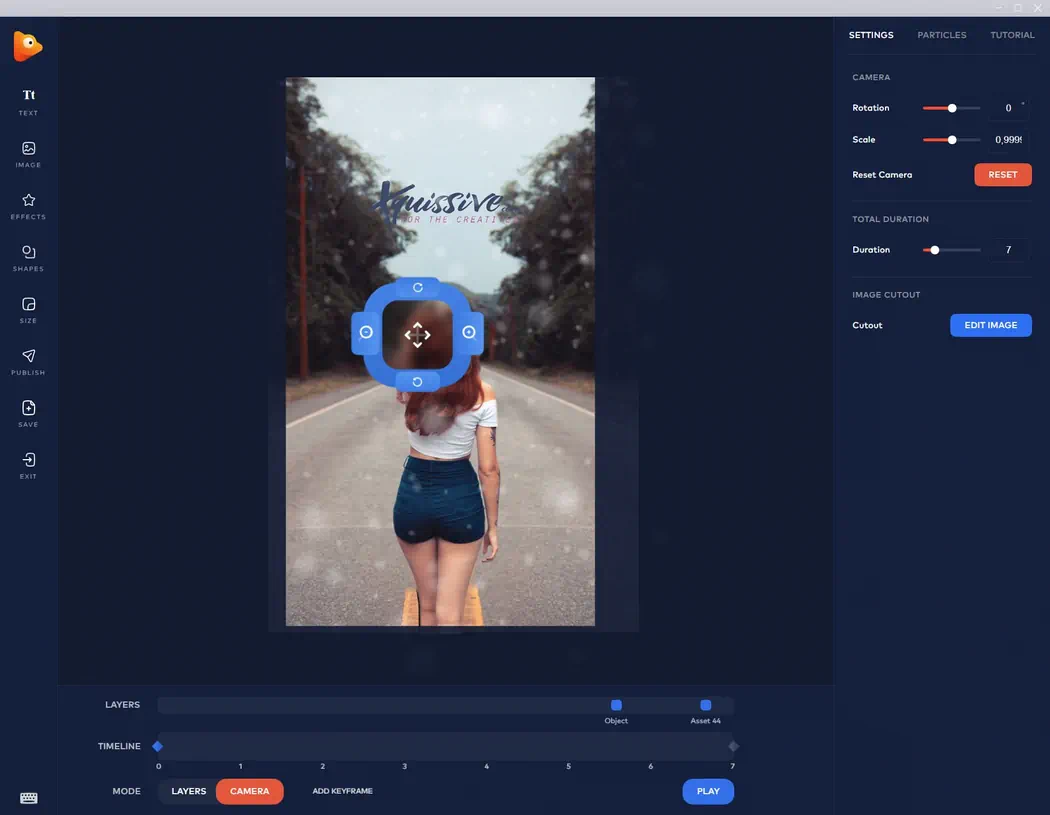
We are going to use the 3D Parallax functionality in this example, because we’d love to create a 3D Parallax image ourselves!
How to create a 3D Parallax image in PhotoVibrance
We will walk you through the steps on how to create a 3D Parallax image in PhotoVibrance. We will cover how to set up the layers, how to animate them, and how to export the image. By the end of this post, you will be able to confidently create your own 3D Parallax images in PhotoVibrance.
Step 1: Pick an Image to Animate
First you’ll need to pick an image. Here, you’ll be given the option to upload your own image from your desktop or select one from the PhotoVibrance library. The PhotoVibrance library is integrated with Pixabay and Pexels, meaning you’ll be granted access to millions of copyright free, high quality images. You can also use your own photographs or illustrations or turn to Adobe Stock, Shutterstock or other stock suppliers for additional images.

Step 2: Select the parts to animate
Next, you’ll need to select the parts of your image that you’d like to animate and the parts you’d prefer to remain static. Select the parts you’d like to remain static by using the ‘anchors’ tool.
Step 3: Preview the image
Once you’ve selected your preferred areas of movement, you can now preview the image in motion. If there is something you don’t like, now is your time to make those changes. You can add additional images, effects, shapes, overlays, particle or fog effects, as well as change the speed of the animation to go slower or faster.
Step 4: Export the image as MP4 or GIF
Now that you’re happy with your image and have finalized all your edits, save your image to your desktop as either a .MP4 or GIF file. You can then use these images on any platform of your choice. Depending on which website or social media platform you’re using, you can also crop your image to fit the specified image specs of your particular platform of choice.
Here’s the result of the 3D parallax image we’ve created, what do you think?
The video below shows you step by step how to create a 3D Parallax animation:
Adding snow to a photo with PhotoVibrance
We created a short PhotoVibrance tutorial where you can see a few images that we have processed to add snow to an image.
PhotoVibrance pricing
Currently the pricing of PhotoVibrance is very attractive, because they are offering a lifetime deal instead of an annual payment. If you’re going to use the software for personal use only, to spice up your Instagram images for example then you only have to pay $39 once. You’ll get lifetime access and you can create unlimited images.
The commercial licence is only $49 and allows you to use your creations for commercial purposes! Another benefit is that you can install it on 2 devices.
Reviews
Here we’ve put together some reviews and testimonials regarding PhotoVibrance – all of which seemed to align with our great experience. Whether you’re a beginner or an experienced computer user, PhotoVibrance is incredibly simple and user friendly. It is also conveniently available for both MacOS and Windows.
We looked a little deeper to see how others have been feeling about PhotoVibrance. For all reviews, make sure to check out Trustpilot. We highlighted a few of the reviews below.
One of the better SaaS on the market. Quality product, support and community. Well worth the investment.
★★★★★
RCMediaservices
The software is easy to use and quite affordable. I love the new camera effects! Just what I needed!!!
★★★★★
Christi Barlow
Great software, Great service, Affordable price. I recommend this software to all the contents creators. You can easily make cinematic photos that you can use for your social media.
★★★★★
Satashi Kosaki
Alternatives to PhotoVibrance
Buy alternative software
One of the most known alternatives is Volumax 6 (check our review). You will need Adobe After Effects to use the software, while PhotoVibrance works stand-alone.
Photomotion is a strong contender to VoluMax 6. Like VoluMax you will need Adobe After Effects to use the software. Photomotion comes with six products in one: Portrait, Glacier, Mirage, Horizon, Depth and Parallax. It also comes with a one-click 3D particles system, seamless loops, easy to use interface, training, live chat and more. Check out the video below to see Photomotion in action. It has over 700+ reviews and has an excellent overall rating of 4.8/5.
Hire someone to create a 2d to 3d image
If you only have a few photo’s and don’t want to have all the hassle into turning a 2d image to 3d yourself, then you can hire someone to do just that for you. We would recommend Fiverr for that. It’s affordable and there are some good rated services available.
Final Thoughts
In sum, we highly recommend looking into using PhotoVibrance to add that special touch to your website or social media. No matter your preference, PhotoVibrance will undoubtedly take your images to the next level, setting them apart from the rest! It is super easy to use and you don’t need any additional programs to be able to use it.
With numerus 5 star ratings, and the vote of approval from us, why not check out PhotoVibrance and begin transforming the way you view photos!
Oh and if you like this and are also looking for a video editor, then make sure to check out CreateStudio (review). It’s from the same company, it works like a charm and it might be just the perfect addition to your creative suit!


0 Comments